Humans have a long history with essential oils. Used in cooking, medicine, health and wellness, and beauty for centuries, the distilled liquids of plant materials came to be called “essential oils” during the Renaissance. Theorists at that time believed they were the very essence or spirit of the plant at its most refined.
Where do essential oils come from?
Although some essences and essential oils are created from animal products, such as ambergris or musk, plants are far more productive and varied. Most essential oils are derived of plant materials.
All plants naturally produce between 30 and 100 unique chemical combinations, which gives each plant its individual aroma and flavor. These chemicals can be removed from the plants and the “essence” of that plant captured in an oil, giving its user a heightened experience of the plant’s chemicals. In other words, oil of rose is the rosiness of hundreds of roses in a single bottle; it is rosier than roses.

Plants’ essential oils are harvested through three methods: distillation, expression, and extraction. Distillation of essential oils typically refers to steam distillation.
Sometimes, one plant’s various parts (leaves, stems, flowers, fruits, roots, and bark) can be harvested in each of these three ways to make multiple essential oils. Often, steam distillation cannot be used on delicate plants that cannot withstand the heat.
It is important to always research for the oil you plan to make. You want to make sure you have the right kind of still, the right materials, and are using the part of the plant that will produce the essential oil you want.
What are essential oils used for?
As far back as the ancient Egyptian Queen Cleopatra, people have been using essential oils when cooking, in cosmetics, and in medicines. Recently, they’ve become popular in aromatherapy and homeopathic remedies as well.
Many essential oils have antibacterial or antifungal properties, which could be part of the plant’s own defense mechanism. Research over the last few decades shows an increase in the knowledge and use of essential oils to relieve gastrointestinal issues, skin disorders, and stress.
You can find essential oils used in beauty products, household cleaners, perfumes, candles, foods, and almost anything that has a scent.
Why distill your own essential oils?
If you have an ongoing condition or use a great deal of essential oil on a regular basis, you may find that it becomes expensive very quickly. Depending on the oil, it can cost you hundreds of dollars per gallon. It may be well worth it to purchase a still and make your own oils at home. If you can grow your own herbs and plants used in the distillation, you may save even more.
How to distill your own essential oils
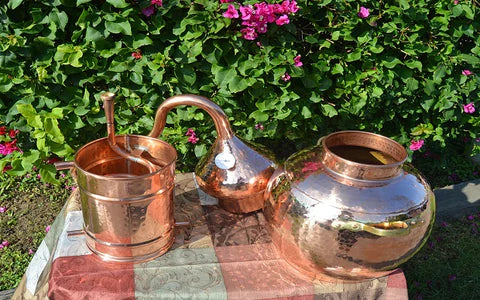
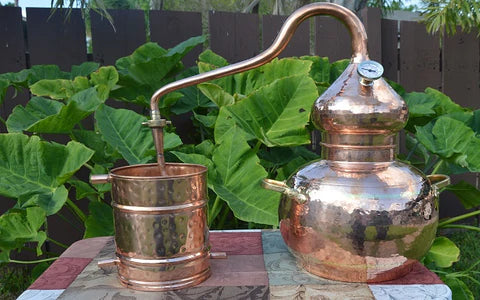
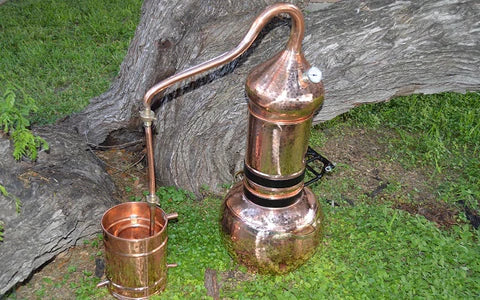
#1: Get a copper still
Copper is widely recognized as the best material for distilling. It has natural antibacterial properties and helps filter impurities out of your final product (the “distillate.”) Copper ions bind with elements like sulfur, which affect your distillate. If you’re distilling essential oils, this is important because it means you will achieve the purest scent of the plant in your oil. Copper also has the most even heating temperature and is very easy to clean.
If you plan to distill water or alcohol in addition to essential oils, you want to consider two separate stills for these products, so the scent or flavor of one does not contaminate the other. Or, consider a flip top column still that is designed to allow you the versatility to make any of them.
#2: Get your plants
Growing your own plants gives you maximum control over their quality and harvest. Plants harvested at the right time produce the best oils. If purchasing plants, choose the healthiest you can find, especially those grown organically without pesticides, if possible. You need a lot of plant material for a little oil, so buy as much high quality material as you can.
#3: Prepare your plants
Depending on the oil you are creating, you may or may not need to wash the plants first. Some essential oil recipes call for using dried plants, so you may need to dry your plant materials first. However, drying them can reduce the essential oils, and it can be very easy to over-dry plants. Never try to re-moisten them after drying, and never use powdered plant materials or plants you don’t dry yourself. Research how to prepare the plants for the specific essential oils you want to make.
#4: Prepare your equipment
Thoroughly clean and decontaminate all the parts of your still and the containers for the essential oils. Have a clean funnel and several cheesecloths on hand as well, for separating oils from the hydrosol.
#5: Distill your oils
Always distill outdoors or in a well-ventilated area, and have gloves, eye-protection, and a fire extinguisher handy.
Place your still over the heat source, but do not begin heating yet. Using filtered or distilled water, fill your still’s pot to the recommended capacity for the oil you’re producing. Generally between 35% and 50%. Secure the column on the top of the pot, and pack your plant material into the column. Do not be shy about how much you use, and do not be surprised if a run of some essential oils yields as little as 1 millimeter of oil in your collection platform.
When you can fit no more plant material in the column, secure the onion bulb at the top of the column and attach the condenser coil. Don’t forget to set up a collection cup of metal, glass, or high-temperature cookware. Never use plastic to collect material from a heated still.
Prepare a cooling process for the condenser coil using ice packs or cold flowing water. Begin to cool the condenser as you simultaneously heat the pot to boiling. When 1-2 drops per second are flowing from the condenser into the collection cup, lower the heat to continue the flow at that rate. When no more hydrosol is being collected, you can turn off the heat. Allow all parts of the still to cool before disassembling it to collect your oils and clean the still.
#6: Collect your essential oil and hydrosol
Different types of column stills will allow you to empty your essential oil from the still in different ways. Make sure you read the owners recommendations for the still you purchase. You should be able to simply filter the hydrosol from the collection cup through a clean cheesecloth before using a clean funnel to funnel it into its final containers.
It can take a huge amount of plant material to harvest a substantial amount of essential oil. Don’t be surprised if you have as little as 1 millimeter of oil after a single run.
#7: Preserve, Store, and Enjoy
Store essential oils in stainless steel or dark glass containers for the best results. Store them away from direct sunlight, and make sure to use a cork or a screw-cap to prevent them from evaporating. Some essential oils lose potency very quickly in open air.
While most essential oils can last for more than two years, they are concentrated and can use some dilution to achieve their ideal effect. Combine your essential oil with a carrier oil like grape seed or almond oil to increase its shelf-life and prevent it from being overpowering.

While many essential oils have been synthesized, there may be nothing quite like the natural oils, depending on your purpose for them. To scent perfume or other beauty products, synthetics will do nicely, however for cooking, healthcare, or true aromatherapy, the best results come from natural essential oils. And if you’re using essential oils often and want the best, there’s nothing like making them yourself.
Article by: Jim Thomas
Photo credit: "Rose Noblesse" by T. Kiya
Photo credit: "Antique glass bottles" by Nancy