
There are a few methods of distilling, but the most common include pot boiling and steam distillation. The most common thing distilled around the world is water - which is used in medical facilities, laboratories, and other situations where clean water is of the utmost importance. And many types of bottled water are distilled to improve taste. However, the next most distilled thing is alcohol, or spirits. Although if you plan to distill spirits in your home in the US, you need the right permits and licenses, but anyone can own a distill and enjoy it distilling water or essential oils.
Essential oils are often distilled by steam, since their delicate plant matters cannot withstand direct boiling. And there are many botanicals that are too delicate even for steam distillation.
You should make sure to do your research on essential oils before you attempt to distill, so that you are sure to use the right method to extract the essential oil you need. Check out our beginner’s guide to essential oils to get you started.
Distilling whiskey, moonshine, or other spirits is not necessarily an easy process, but it is not difficult either. Follow a few essential steps, add your own style, and you can develop a fine distilling operation with a little practice.
Step 1: Purchase and Prepare Your Still
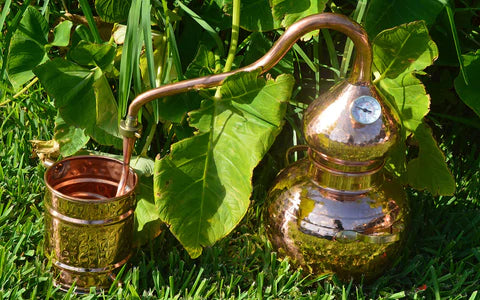
First time distillers often make the mistake of purchasing the wrong still for their plans, and are stuck with a still they can’t use. Do a little research first and learn why the best stills are copper, and what type of still you should use. Although you will become very familiar with all the parts of your copper still once you have your hands on it and are cleaning and using it, it can be helpful to become familiar with the parts of a still before you get your hands on one.After your copper still arrives, you will need to fully clean and prepare it for its first use. Cleaning a copper still inside and out is as simple as using a 50/50 solution of white vinegar and warm water, and a lot of elbow grease. You will want to rinse it well with hot water after scrubbing all parts with a new, unused toilet brush or carboy brush, and dry all parts thoroughly.
Lastly, you will perform a vinegar run to thoroughly cleanse and sterilize all parts of the copper still. While making sure to safely set up your still on its heat source, fill the pot to 20% capacity with a mix of clean water and white vinegar. Heat the still without cooling the condenser coil so that the hot vinegar and steam come out of the coil into the collection cup. Once you have reached that temperature, you know that the entire interior of the still has been thoroughly cleaned.
Allow the copper still to cool before rinsing with hot water, drying, disassembling, and storing. It is not ready to distill whatever you want.
Step 2: Make Your Mash
The plant materials that are fermented to produce the final alcoholic product you are looking for is called the “mash.” If you don’t have a trusted mash recipe when you buy your still, you can choose from one of the hundreds available.
Whiskey and moonshine mashes are composed of a grain - such as oats, barley, or wheat - and something to turn the natural sugar in the grain into alcohol. Yeast, sugar, and water are often the only other ingredients. Mashes often need to sit and be mixed for 14-30 days, in a separate and sealed and vented container.
You can infuse a mash with flavors from the beginning, and some alcohols are so exclusive to their recipes that if you don’t follow the recipe exactly, you can’t call it that drink.
Scotch, for example, has to be 100% from Scotland, made in Scotland using Scottish ingredients. It also includes a recipe where the oats are dried and smoked over an open peat-moss fire - that is what gives Scotch its unique flavor and uniquely qualifies a drink as true Scotch.
Step 3: Prep for Safety
When you’re getting ready to distill alcohol, water, or essential oils at home, you need to be aware of the safety concerns, and the risks of working with high heat and alcohol vapor, and the importance of never using plastic tools and materials.
Basic Safety Tips
You might want to consider having a fire extinguisher at hand. You definitely need plenty of cold water or ice packs for your condenser coil, and make sure to have at least one thermometer to help you control the temperature of your distillation. You will also want to have thermal gloves, and might even consider eye protection. See our list of 7 Safety Tips for Distilling at Home for more.
Make Your Flour Paste
You will make a flour paste to keep the alcohol vapor in your still from escaping through the seams during the distillation process. This is a huge safety concern, because alcohol vapors can be flammable and you can create a potentially explosive environment if they escape. It is also a huge concern for maintaining the quality of your final distillate. In order to keep your final whiskey or moonshine at its best quality, you want all the seams to be sealed shut. See our recipe for an easy do-it-yourself flour rye flour paste that will help you run all your distillations at peak performance.
Step 4: The Distillation “Run” in 6 Parts

The day you perform your actual distillation run has come and you’re ready to make some moonshine. Grab your mash, and follow these instructions:
Part 1: Set Up Your Still
Begin by setting your clean still equipment up on your heat source in a well ventilated area, with all your safety tools at hand. Make sure your still is secure and your condenser coil prepped with a coolant system of packed ice, running cold water, or frozen water bottles. You want your collection container on a flat surface, if possible, and you never want to use plastic. Mason jars, ceramic or metal containers are all traditional collection cups for moonshine distilling.
Pour the mash into the pot of the still, leaving space at the top. We recommend about 4 inches for a 10 gallon copper still. You will not need to apply flour paste yet, but have it ready. Pour your mash into your copper moonshine still, leaving space at the top.
Part 2: Heat Your Mash
Turn on the heat source and increase until you can hear the mash boiling or the pipe connecting the still’s onion head and condenser is hot to the touch. When the temperature reaches about 100 degrees in the still pot and the copper has begun to get warm to the touch, apply the flour paste to the seams between the pot, the column, and the condenser coil (if there is one). If you notice any other small leaks you might try using some flour paste to seal them, but if there are any large cracks or problems with steam and escaping, stop distilling immediately and have the still inspected by a coppersmith.
Many old-time moonshiners know when the still has reached the right temperature by watching the amount of the distillate. You want to see a steady flow into the collection cup - not a stream or a slow drip, but a steady drip of 1-2 drops every second or two. It is most helpful to have two thermometers to monitor the temperature in both the still pot and at the top of the column or in the onion head, just before the condenser coil. You can monitor the temperature of the condenser coil by touch - it should always be cool while the still is running. If the coil reaches room temperature or gets warm, immediately cool it with cold running water or ice packs. If it gets hot to the touch, stop distilling immediately.
Start applying high heat to your copper whiskey still, Lower the heat, and monitor the temperature at the top of the onion head. Keep it between 174 Fahrenheit and 190 Fahrenheit by adjusting your heat source.
Part 3: Monitor Your Distillate
In addition to taking note of the temperature of your run in order to tell about its different stages, you will also want to pay attention to the look, feel, and smell of your moonshine or other final product. Using a notebook or other recording device to document what the distillate was like at different temperatures in the run can help you know how to make better cuts in the future, as well as get more familiar with what a “successful” run looks like for your still. (Each still has its own personality, and it may take a few times of using it before you realize any peculiarities in its temperament. Like a fine car or a well-loved tool, be patient and you will be able to learn what you need to know to make each run successful.)
Continually check the still for vapor leaks and patch your flour paste as needed. Be careful not to burn yourself on the hot metal or any steam from the condenser coil or unsealed seams.
Part 4: Cut Your Run
For safety reasons, as well as practical ones, you can’t collect everything from your moonshine run into one container. Make sure you become familiar with what it means to “cut” your run while distilling, so that you can produce high-quality, enjoyable moonshine and whiskey.
The most important cut in your run is the first one - always collect the “foreshots” in a separate container. Because methanol boils off at a lower temperature there is a lot of it in the early part of your run. Methanol is poisonous and should not be consumed by people. By collecting all the foreshots in one container, you can be sure to keep the methanol out of your moonshine, keeping it safe for anyone who drinks it. Always throw out the foreshots once you have made your first cut.
Part 5: Know When to End
There is no reason to heat a still over 212 degrees Fahrenheit, as that is the temperature that water boils. When the still reaches 212 degrees you can turn off your heat source. At this tail-end part of your run, the distillate will have more distilled water in it than earlier in the run, and the hotter you run the still, the more water will end up in your run’s tails.When the run is over, the temperature in the onion head will suddenly drop, and the condenser will stop dripping alcohol. Although there may still be some alcohol left in the mash in the still pot, the effort that it would take to get the alcohol out isn’t worth it. You can run the still a little longer, but all the portions of your tails will be added to a future distilling run so you can further purify them and turn them into hearts.
Part 6: Cool Down and Clean-Up
After the run is complete, let your still cool completely before disassembling and cleaning it. You should be able to chip the dried flour paste off the seams easily, but it will dissolve fully once the still is washed.You will want to empty the mash carefully outdoors - choose a spot in your yard where you don’t mind if the grass turns brown, as the mash will likely kill it quickly.
To wash and fully clean your copper still, use a mixture of hot water and white vinegar, and make sure to scrub all surface areas on the interior. Rinse the still and dry it before storing for your next distillation.

Making alcohol can be both fun and challenging, and there are several ways to get the formula right. Whether distilling whiskey, moonshine, vodka, or some other spirit, a good distillation run always results in a toast to a job well done.
Article by: Jim Thomas
Photo credits: Leslie Kalohi